
You don’t need to be a professional baker to pull off these easy Easter sugar cookies. They’re simple to decorate, but make for a stunning (and delicious!) result.
Looking for some easy decorating ideas for your Easter sugar cookies? We’ve got you covered with 8 adorable ways to take your spring-themed cookies to the next level, without a crazy amount of time or effort. With our simple tips and designs, you can get professional looking results, worthy of any Easter basket or family gathering.
And to sweeten the pot, we’ve teamed up with SPLENDA, to provide you with a No-Sugar Sugar Cookie recipe that is super easy to make (no sticky dough!), and serves as a delicious base for our fun designs.
So, what do you say…let’s get baking!
PIN for when you’re ready to make some easy but gorgeous cookies!

THE COOKIES
First things first, you’ve got to make the cookies! We like to use a lower-sugar recipe because it leaves plenty of room for fun and creative decorating.
We’ve tested a lot of sugar cookies recipes, and this No-Sugar Sugar Cookie recipe is by far the best we’ve ever made. The dough is easy to work with, and doesn’t become a sticky mess on your rolling pin – allowing your kids to help with the rolling and cookie cutting without any frustration.
And once baked, the cookies still have that sweet, buttery, melt-in-your mouth flavor. Yum!

By using SPLENDA No Calorie Sweetener, Granulated instead of sugar you’ll save 678 calories per cup (editor’s note: my post-baby body is thanking me already!), and it can be substituted almost anywhere sugar is used.
You can purchase SPLENDA No Calorie Sweetener, Granulated at your local grocery store (make sure you check for coupons here first to download, print and use in-store), or via their website.
After browsing through the designs below, choose your cookie cutters and place your cut dough on a lightly greased (we used an avocado oil spray) sheet pan.
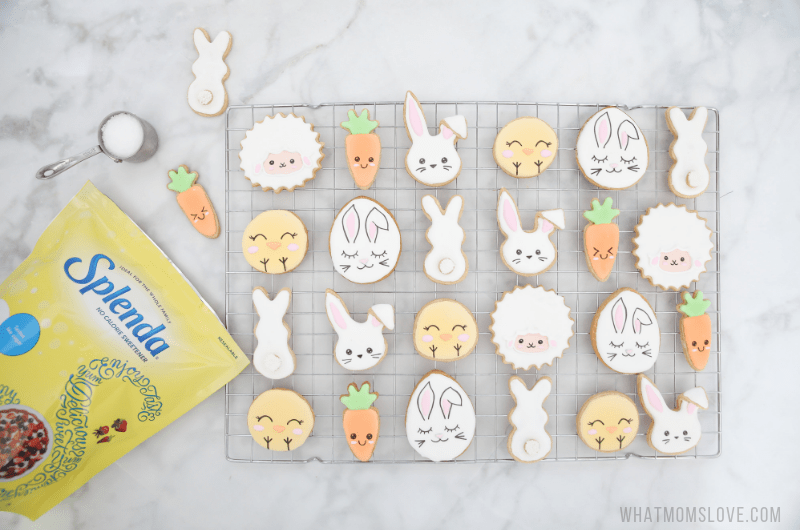
Once they come out of the oven, transfer the cookies to a cooling rack and make sure they are completely cooled before icing.
While you wait, clear your counter top so you have plenty of room to spread out for decorating and make a cup ‘o joe. We recently discovered these amazing new SPLENDA Coffee Creamers (they have no sugar or corn syrup and are only 15 calories!) and they add such a rich, creamy flavor to our coffee, but none of the guilt. We keep going back for the French Vanilla, but the Sweet Cream and Hazelnut are also heavenly.
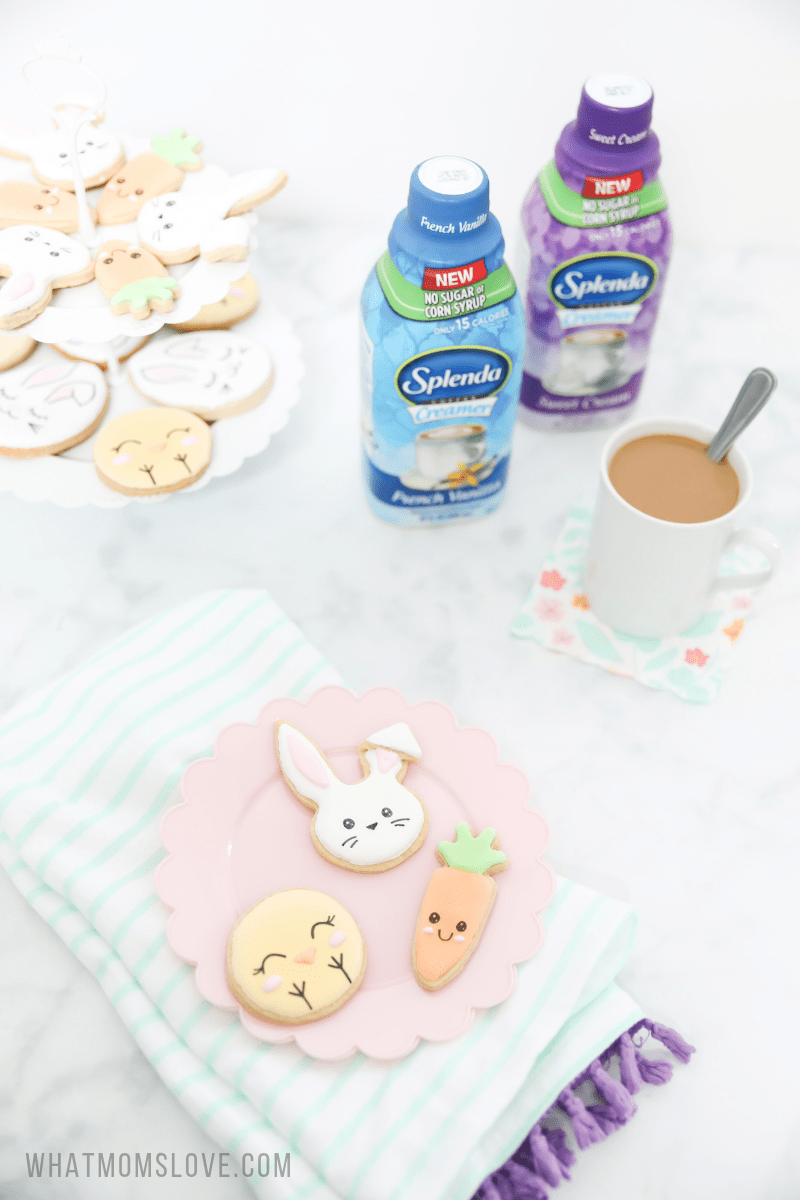
WHAT MOMS LOVE DEAL – Save $1.25 on any SPLENDA Coffee Creamer in-store (find them in the refrigerated aisle at select retailers in the Northeast US) with this special coupon, or get Free Shipping online by using our code at checkout: SPLENDACREAMER
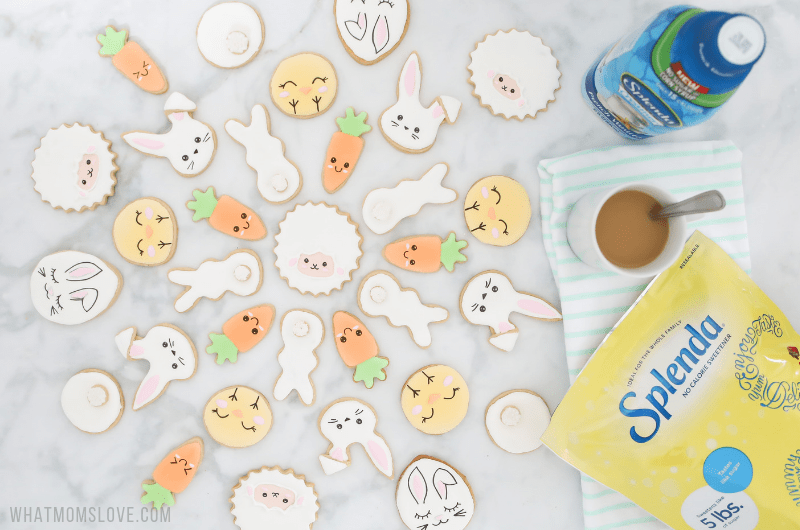
THE DESIGNS
Now you’ve baked your Sugar Cookies, it’s time for the fun to really begin. And because decorating the cookies should be fun, we wanted to provide you with some simple, fool-proof ideas that will make them even Easter Bunny approved.

All of these designs use Royal Icing which gives professional-looking results with a smooth, hard finish. If you’ve never worked with it before, don’t be intimidated…all the cookies seen here were made by a first-time Royal Icing user!
The designs below will help you keep it simple, but here are a few tips when using Royal Icing:
- Once whipped, cover the bowl with plastic wrap (in fact, place it directly on top of the icing) or a damp cloth to keep it from drying and making flaky bits in the icing.
- To create different colors, scoop out a portion of the white icing into separate bowls. Add your food coloring a little bit at a time, mixing with a whisk or spatula before adding more. When the icing dries, the color will look a little darker, so you’ll want your wet icing to look one shade lighter than your desired color.
- Scoop your finished icing into a piping bag (we like the disposable kind as they make for easy clean-up) with your selected piping nozzle. If you don’t have bags/nozzles, we had great success with using a regular zip-seal plastic bag (the Freezer kind are a little sturdier), and nipping off one of the corners!
- Don’t be shy about really flooding the cookies with the icing – this will make for a much smoother, even finish.
BUNNY TAILS
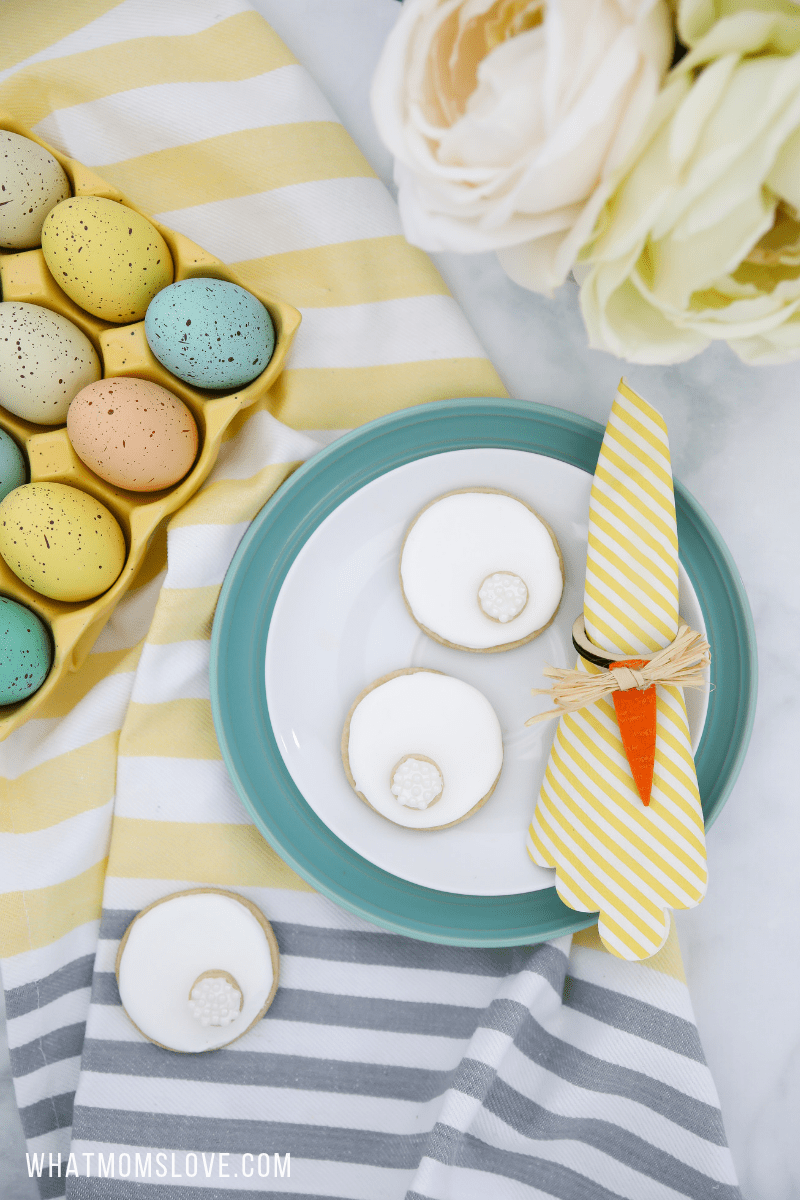
These circle cookies are great ones to start off with, as they’re easy to zip around with the Royal Icing, and you don’t have to worry about any fiddley bits.
Outline your cookie with Royal Icing first, then immediately flood the inside with more icing. This will allow the lines to blend together, which is quite forgiving to any shaky piping. If you have small gaps, use a toothpick to close them with the icing.
The Bunny Tails are the easiest of them all. A simple white iced cookie, with a smaller circle cookie placed near the bottom (if you don’t have a small circle cutter, try using the base of a piping nozzle).
We dipped our “tails” into white pearl candies for a little added texture.
If you don’t want to go down the Royal Icing route, you could even pull these off with just a regular store-bought white frosting. We’re not here to make your life complicated…do what works best for you!
BUNNY TAILS 2
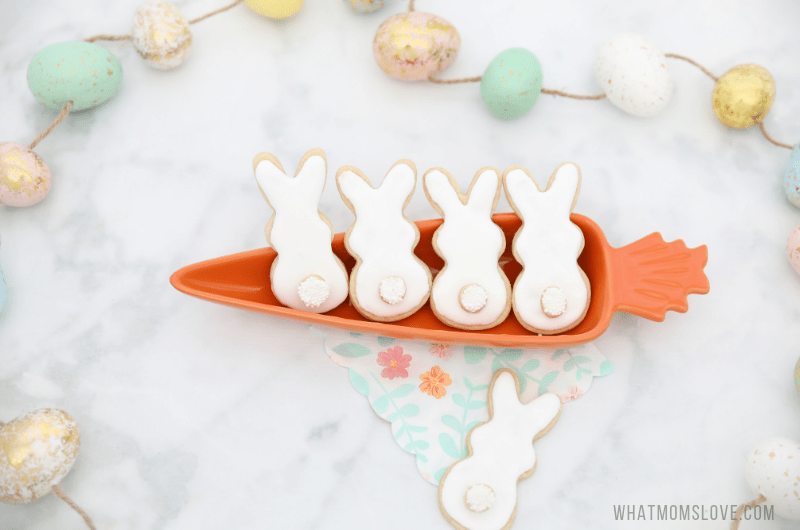
Following the same steps as the circle Bunny Tails above, you can create these cute bunny backsides just by switching up the cookie cutter!
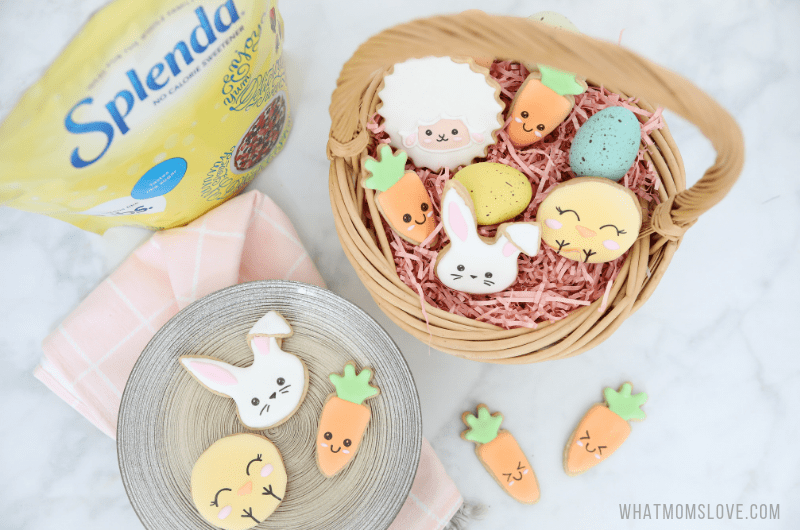
CHICKS

And how adorable are these little chicks?! Cover them in yellow Royal Icing and let them dry for at least 12 hours. Then take a black edible pen and draw on a face. Yep, you read that right, just draw it on – no need to make black icing and do precision piping with these designs. We did add a little orange and pink icing for the beak and cheeks (as we had these colors made for some of the other cookies), but they will look just as good with the simple sweet face.
CARROTS

These sweet carrots require a little added time, as you have to wait for one color to set before adding the second, but the result is well worth it.
And yes, you guessed it, the face is just drawn on with our favorite edible ink pen. Mix up the facial expressions and pair them with the bunnies for an extra sweet combination.
FLOPPY EAR BUNNIES

These bunnies are one of our favorites – that floppy ear gives them some added whimsy and a great sense of dimension, and best of all – it’s super easy to do.
Simply use a cookie cutter to cut a bunny face out of the dough, then fold over one of the ears before placing in the oven.
Finish these off with a coat of white icing, and use that handy edible black pen to draw on the face. Completely optional is the pink inner-ear. If you decide to do it, just wait until the white icing has set enough for the colors not to run together.
SLEEPY BUNNIES

These sleepy bunnies may just steal the show, but are created with just a simple oval cookie cutter. Frost the entire cookie and wait at least 12 hours before using your edible black pen to draw on the face.
Again, the pink accents are totally optional.
INVITATION-TO-CREATE COOKIES
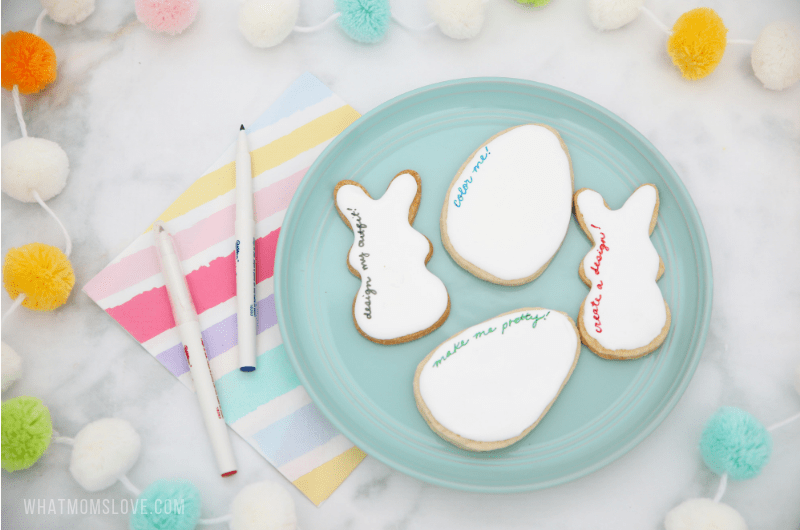
We love the idea of leaving the decorating of the cookies to the recipient. Simply frost any Easter-themed cookie with white Royal Icing, and once it is set, write on the instructions. Leave different colored edible ink pens with the cookies and let your kids or guests go to town creating their own sugar cookie masterpieces!
These would be great fun at your Easter Day gathering to leave out on the kids’ table for a craft that they can then eat for dessert!
LAMBS
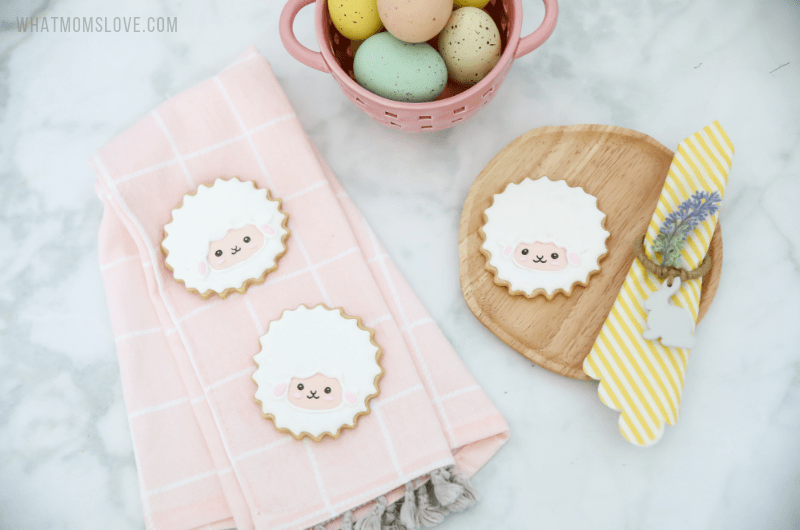
The lambs are the most “involved” of our designs, but are still relatively easy compared to some of the intricate piping we’ve seen on other Easter sugar cookies.
Use a fluted circle cutter to create the lamb’s wavy wool. Bake, cool, then outline the entire cookie and face area, filling it in with white icing.
Before icing, use an edible pen to draw the face shape directly onto the cookie so you have a guideline for piping. The pen lines will get completely covered, so don’t worry about making a mistake.
Once the white icing is dry, fill the face with flesh colored icing (we mixed brown with a teeny touch of red), and let dry. Come back in with white to outline all the way around the face, and the ears. Finally, add a little pink to the ears and cheeks.
Use your edible pen for the face and your baaaa-utiful lambs are complete!
Now you have your beautifully decorated Easter sugar cookies, take a moment to enjoy your creations. Go wild and put your feet up with a cup of coffee and sample one yourself!
And remember to grab the new SPLENDA Coffee Creamers to boost the delicious-ness even more, giving your coffee a rich, creamy flavor with only 15 calories.
What design will you be making this Easter? Let us know in the comments below!
Thanks again to our sponsor, SPLENDA, for creating the No-Sugar Sugar Cookie recipe, that is a delicious lower-sugar base for our Easter designs.